
Hoppy almost Easter friends… I know this year Easter won’t be the same, but I wanted to share a few easy ideas you can do to make your table just as special. I think creating a pretty space to celebrate even though it may be different than what you’re used to can really cheer you up. So here are a few table settings to give you a little inspiration.
Pretty In Pink
I love this sweet touch of pink mixed with the pops of black. I used my everyday check table runner and placed a few simple cherry stems down the center. I purchased these cute eggs but it would be so easy to just paint the letters on faux eggs.

For the place settings I used a black charger, our everyday dinner plate, layering a pink napkin in between and an Easter accent plate. Super easy, casual but so cheerful.

Spring Green
I love the bright, fresh spring green colors mixed with white and pops of black. It looks so crisp and the perfect theme for the holiday. I added a very simple centerpiece with my same everyday runner and a moss basket filled with faux tulips, you can use real ones too. You can also create a moss basket by gluing some moss to a regular Easter basket.

For the place settings I once again used the black charger and white dinner plate but for a special touch placed a nest into a small wreath and tucked a cute egg into the nest. Sweet and simple details creating the perfect Easter table.

Bunny White
To me, white represents Easter perfectly and adding a touch of black gives it a crisp, chic look. I think popping in some green moss adds a natural feel and ties everything together.

Once again the same table runner, but I created a little vignette on a tray. I placed white ceramic bunnies in the center of the tray, tucked in various sizes of white cabbage roses and ranunculus flowers, then filled in the gaps with some moss. I added my marble eggs to finish off the look.

For the place settings I layered all white dishes and created a mini vignette at each place setting. I just spray painted terra cotta pots white, tucked in some moss and added one of the marbled eggs. You can learn how to make them in this post ( they are so easy!) How To Make Marbled Eggs
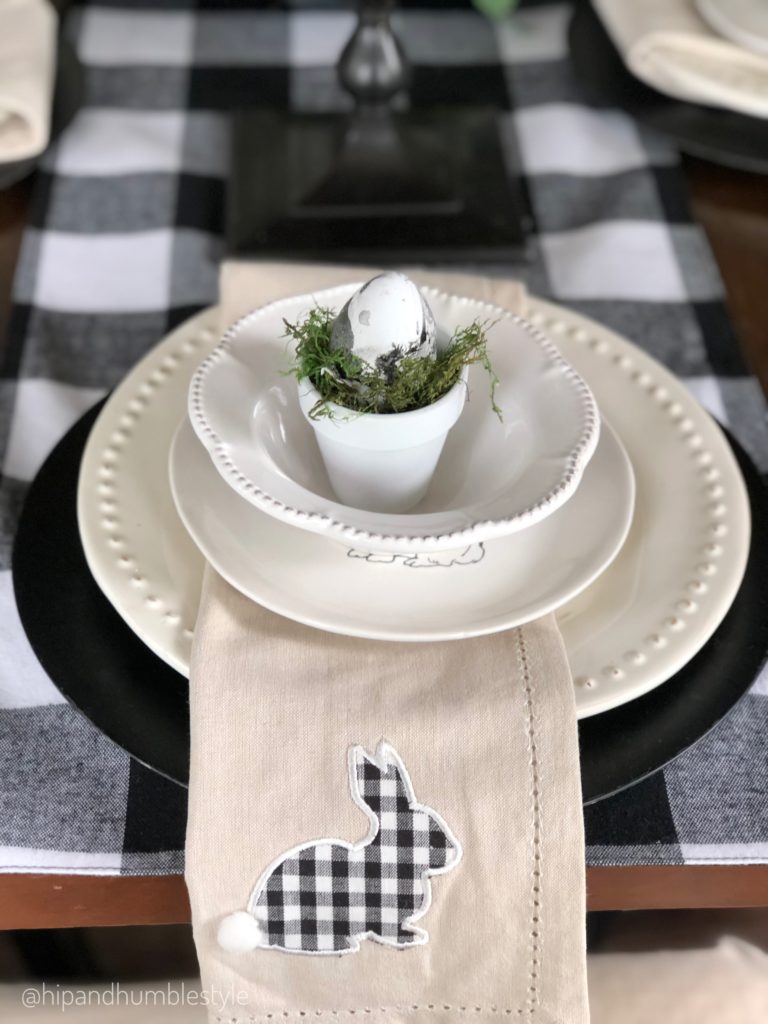
The other cute think in this place setting is the fun napkins. I’ve had this style a long time but I found a way to create your own and it’s super easy.
Here’s what you need to make the bunny napkins…
- white napkins (or a light color of your choice)
- patterned fabric- I used the black and white gingham but any print would be cute
- heat bond or wonder under. Its a product that lets you create an iron on applique
- white puff paint for fabric
- white pompoms
- glue gun
- iron

First, create a pattern on a sheet of paper of the bunny shape you like. If you have a bunny cookie cutter you could use that to trace for your pattern. Cut a square of the fabric and heat bond paper the same size and press them together with your iron, then trace your pattern on the paper/ Cut out the bunny then peel the heat bond backing off.

Then place the bunny where you want it on the napkin and iron it on. Once it cools it’s time to add your paint.

Next, trace the out line of the bunny and wait for it to completely dry.


Once the paint is dry you can glue on the pompom for the bunny’s tail.

Another fun idea is to create this cute bunny place card holder or a fun decoration for the table. Your kiddos can even help with this one.
Here’s what you need:
- card stock color of your choice (white or brown is best)
- plain paper to create a pattern
- white small flowers of your choice for the tail
- scissors
- hole punch
- hot glue(if needed)

First, create the pattern in the bunny shape you want. Mine was a simple pattern to draw. Then trace the pattern onto your card stock.

Then, cute out your bunny shape. You can stack your card stock and cute a few at one time.

Once your bunnies are cut out, punch a hole for the flower stem to go through. Cut your flowers so the stem is about an inch or so long to serve as your stand for the bunny.

Poke your flower in through the hole and add a dab of glue to hold it in place if needed. You can add names on them to personalize each place setting.

I hope you found something to inspire your Easter table and you enjoyed the different looks. Which one is your favorite? I love hearing from my followers and appreciate your feedback and questions. Be sure to subscribe to the blog so you won’t miss any posts.
I hope you have a blessed Easter in spite of the crazy times we are living in right now> I hope you stay healthy and hang in there friends.


")


Beautiful touches for Easter. Love your home and you always bring me inspiration! Thx for sharing and have a happy weekend!
H&H,
I do love the Spring green & Bunny white Easter Tablescapes!
The pink is sweet.
Thank you for always inspiring!
Pat
I just want to thank you for all your wonderful ideas that you share with us. The table scapes are always beautiful and always done to a perfect detail. I always look forward to everything that you show us and how to make different rooms look elegant. Thanks again hope you have a wonderful day.
I happen upon your blog on Pinterest when looking for Easter table ideas since we couldn’t celebrate with our extended family during the social distancing. Your ideas are wonderful and my little table was so cute! I think I’ve read every post in the last week and currently my husband is amused because I have all my Christmas plates out planning. Never realized I could layer my plain white Pottery Barn plates (I had always put them away for the season). Thanks for great ideas!
Hi Maria,
Yay I’m so glad it was helpful and you enjoyed it. Having fun with your tables, sounds like you’ll be super prepared!
Thanks so much for following along and stay well.
Deborah