
You know what makes me crazy? Having clutter and supplies everywhere and no way to manage it and know where everything is, that’s what. So, I decided to do something about the frustration I was having over keeping track of my extra decor and all my craft things. I decided to turn a small attic space corner into a place where I could keep it all, and do crafts keeping my artistic flow and not searing for days or buying something I already had. Here are the steps I took to revive my messy collection of stuff taking over…and it’s such a great feeling now that it’s all together. I also want to add that a year later I can say this space has been a dream and still in perfect organized condition. Keep scrolling on tips to organizing your craft space.
Crafts stuffed everywhere even the garage and I was tired of things disappearing or getting damaged. Not to mention all the repeat purchases of things I didn’t realize I already had. Another problem I was struggling with was all the extra decor items I had everywhere. Without a specific place to put things, I really had no way to really see what I had to work with and what I had too much of.
So, that meant time to get this under control and more productive. I really haven’t had a space to keep things all together in this home or for a few years, so things got quickly out of control.
Here are the steps I took to get this little space together and all my stuff! I hope these tips to organizing your craft space are helpful!
Space
It doesn’t have to be big. Think outside the box a little and look for places you can convert into what you are needing the most.

Finding an area to designate is the first place to start. DO you have an extra closet you can convert into storage or a small space in a room that you can section off to create a little place for your stuff?
In our case, my closet space in our home is lacking, and although I thought I could just keep my extra decor in a guest room closet, I didn’t like how cluttered it looked and really didn’t want it in a space where our guests stayed and could possibly need the closet space. Things were just piling up and getting access to it all was a mess.. Plus, there was still no place to organize all the crafts.
However, we do have a finished off attic space that we use as guest room overflow and it was becoming a place of collecting junk. So I decided to make this a more productive and functional area and create my craft space here. I wanted to be sure it was easy to access and would be a place where I could still feel creative and keep it neat and pretty. Also, I didn’t want to spend a lot of money! I measured how much area I thought I would need to create the most functional space without it taking over the whole room.
I divided the room in half and then sectioned it into 2 sides . Then I took measurements to decided what size of cabinets would fit into the area before I ordered anything. Once I had some dimensions, I researched the best prices and ordered the cabinets.
Take Inventory
Once you’ve determined a general area where you want to create your space, take inventory of all the items you have. That way you can get a better idea of how much you have and what type of storage items you may need. Get some bags or empty boxes to gather up and separate the giveaways, the trash and the keeps.
This part is where it gets worse before it gets better. I went through the house first collecting all the extra decor I had from every place I had stashed it. Then I went through items to get rid of and cleared all that out first. I decided to get 2 narrow inexpensive cabinets that I could place on one side of the space to store all the extras in. I wanted it easy to access everything and to be able to see it all. Also, I told myself I was only keeping what would fit into these 2 cabinets. Anything more than that is just too much stuff to hold onto for nothing.
Create Sections or “departments”

To help make it more functional and useful, I sectioned the room off and started with one side at a time trying not to get to overwhelmed. If you try to take it all on at once, you can get so overwhelmed that you give up or procrastinate the project all together. Pace yourself and what you have time for.
First I painted out the areas for it would be bright and have a fresh background to start with. I chose a bright white to give more light in the room and keep it more neutral and soothing for my tastes. Black and white is basically the best pallet for me to work in.
Once I painted the walls, I started with the extra decor side. I put together the large cabinets and put them in their place. Then added all the decor items I had cleaned out and were ready to be stored. I can’t believe how much of a difference just that one little step made and it definitely motivated me to keep going. There’s something so satisfying about financially seeing your possessions in a neat and orderly manner.
Create Storage options


Once the decor side was complete, I decided to tackle the crafts. I knew this would be a big undertaking but seeing the small changes already were enough to keep me going. Again, this had to get worse before it got better. So, I went around the house and gathered all the crafts from everywhere I had them stuffed, garage, various cabinet and drawers (It was worse than I thought) When we moved in I had no clue where I wanted to store it all so I found the quickest empty spot and stuck it there…Do you ever do that?
You have to find a “staging area” to put it all then just tackle once container at a time, throwing away old stuff( I had a lot- aka dried up paint and other “stuff”) While you are going through it all, make piles in categories of all the items you have. Whatever makes the most sense to you.
That way, you can determine what type and how many containers you may need to store everything you have.
Make it pretty and functional

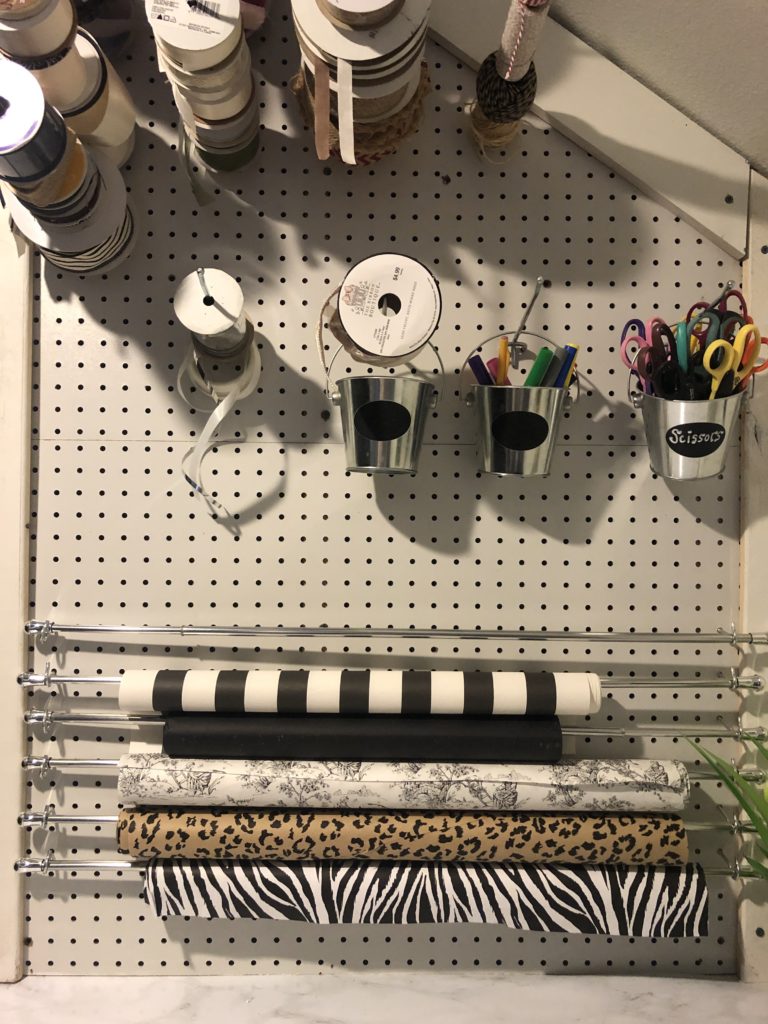
I also wanted my space to be set up where I could actually use it for creating and crafting. I purchased and put together these Ikea drawer cabinets and then using MDF board, my husband cut them to be used as the counter tops placed on the cabinets. Then I covered them with marble contact paper. I also had this pegboard for wrapping paper in another location and had my husband relocate it to create a wrapping paper station along with the craft work space. I’ve always wanted one and so excited to finally have a designated area for this. I love sharing these tips to organizing your craft space


My husband reconfigured how to fit it in this space and It worked out perfectly.

On the pegboard I used pegboard hooks for the ribbon and then used inexpensive curtain rods with hooks to hold them for the paper.

Assign Everything a Designated space and Label it
Once you have your storage pieces assembled and your crafts all categorized, it’s time to find them a home. Put your items together in a system that works best and makes the most sense for you . I categorized mine in sections. One cabinet holds all the general crafts, the other holds all items such as extra bags, tissue, stamps etc. Then below the wrapping paper station, I have all the items for card making and scrapbook supplies.
I also lined the drawers with a cute wrapping paper just to give it more style and then used my favorite label machine to give everything a name. This makes it easier to find exactly what you(and others) are looking for.


And there ya go friends, voila a space where I can once again find what I need and utilize what I have so much better. Overall this project took me about a week with a little bit of prep and planning ahead of time. It just starts with a small vision and then just determine what you want the space to do for you. I also know in the long run it will end up saving me money because I won’t be spending it on things I already have and really don’t need. It’s also helping my creative energy to have an area where everything has a place.

Shop The Post

I hope this was super helpful and encouraging – tips to organizing your craft space I can’t stress enough how satisfying this project was for me. There’s just something to be said about organizing your spaces. It improves the daily quality of your life and can save you a lot of money. Clutter and too much stuff just overwhelms and steals creative energy in so many ways!
Be sure to subscribe to my weekly newsletter to stay updated on what’s new. I’ll be adding more organizing ideas too.
So what organizing project are you wanting to try? Here’s your pep talk … Do It you’ll be so happy when it’s done!
Happy Organizing!
Tips to organizing your craft space


")


I love the space that you created for your crafts. I have ordered the cabinets and file cabinets for my craft room. Hoping I can make mine as nice as yours. You have given me hope. I also made a heart for my Valentine and will send you a picture of it to see what you think about it.
Thanks again for all you have shown me how to do in my own home. Also loved the laundry room make over as well. Hope you have a great day.
Hi Phyllis,
I’m so excited to hear you have been inspired to try these projects and that you are enjoying my blog. It’s why I do this and I love knowing that the projects are fun to do. Thanks so much for your feedback, I would love to see pictures of your completed projects.
Hope you will come back often, I really appreciate you.
~Deborah xoxo
Turned out awesome! Great use of space
Wow looks so good. Great use of space
Hi Becky,
Thanks for the kind feedback appreciate it!
Deborah xoxo
This is a fantastic use of this space! Were you able to store what was in the room somewhere else? I’m giving my craft closet another look to see if I can make it better and use some of your ideas. Thanks for such a helpful post!
Hi Sharon,
Thank you,
I’m not quite sure what you mean? There wasn’t anything else in the room but the two beds and they are still on the other side of the room.
So happy it was helpful
Deborah
I’m using some of your ideas in your craft room, when I seen it last year and it has kept everything in its place, till now . Thank you so much, your my favorite. My husband and I are going to make the fabric bed skirt.