
If you are planning a wedding, you know it can be a very stressful and expensive process. My son was recently married at our home, & I wanted to share with you some ideas of things we did and hope that it will give you some inspiration. Even if a wedding is nowhere in your future, these are ideas that can really be incorporated into any fun party or event. So, follow along for some party inspiration!
A few months ago when my son and his now wife announced their engagement we were beyond thrilled! They are such a sweet couple and wanted a simple outdoor wedding. They love any activity that is related to water, so we all thought it would be fitting to host the wedding here at our home on the lake.
I absolutely love to entertain and throwing a party is one of my favorite things to do. So you can imagine how extremely excited I was to have this opportunity. The bride had a pretty good idea of what style she wanted and she and my son we very insistent that it be simple, low key and relaxed.
The theme, since it was outside was rustic Boho. To keep it inexpensive, we decided to use as many natural elements that we would have access to and try to find basic things we already had. I chose to use “permanent” flowers for several reasons; they are less expensive, they are easy to manuever for arrangements and they last! As much as I like to entertain, I felt that I could make plenty of use for the greenery in the future.
The Welcome Table
To welcome our guests, we used a small wooden table to display photos of the couple, the guest book, & 2 little jars for date night and advice ideas. My son made the sign from plywood and they stained it a dark walnut stain. The final touch was a floral swag I made using the greenery and flowers attaching with a staple gun.

The Wedding Area
My son also built the beautiful arch and stained it the matching dark walnut. Previously used, sheer curtains acted as the draping and I made a larger version of the floral greenery swag to finish off the details.

We rented white chairs and to define the isles, added silver pails with real baby’s breath to set by the chair rows. Just having all that real baby’s breath created the most beautiful, soft fragrance that it smelled like we had a whole yard of fresh flowers. This little flower is also very hearty and is great filler for anything. As you will see, we used it everywhere. It just says “wedding” whenever I see it.

* TIP: By layering different types & shades of greenery, you create a more realistic, fuller appearance & more texture to the arrangement.
(pardon the ladder in the background…this was the best close up I had to see the details of the arrangement…real life!!)


The reception tables
On the tables we used white table linens, placed a piece of burlap in the center, a wood slice, decorated lanterns and ball jars wrapped in burlap and lace then filled with more baby’s breath. The place settings were a beautiful disposable plate trimmed in silver and I wrapped disposable flatware in a heavy linen napkin. I created the napkin rings by tying a small burlap heart (purchased from Michael’s) with jute then added a sprig of the greenery. It was so easy! We placed a paper doily under the plates to add a charger look and another element of texture.
The sweetheart table used the same elements, however I added more greenery down the center of the table and a little wooded sign. The back drop created some nice drama and a great feature. We attached a painters drop cloth to a board going across 2 trees. I attached greenery & flowers to various sizes of embroidery hoops and we hung them at varying lengths with fishing line. I love how it created a soft, but beautiful background and it helped define the dining area of the yard.
*TIP: battery operated remote control candles are ideal for events where you need candles. Not only are they safer, but more convenient. You can turn them on before your event starts so candles don’t need to be lit and they create a great atmosphere.


The Cake Table
I think the cake table was my favorite! We made the stands from wood slices in our yard and then I brushed a clear polyurethane on them to protect the wood a little. We made them at varying heights and sizes with the idea of a “cascading” cupcake display. I wanted the 10″cake to have it’s own spotlight so placed it on the opposite side to create a story. The cupcakes were surrounded by a scalloped natural wrapper .
The cake was store bought then unfrosted to give it a more naked, rustic look. Just a few sprigs of baby’s breath finished it off. The bride purchased the little wood topper on Etsy. The cake knife and server handles are wrapped in jute ( purchased at Hobby Lobby) To finish off the display, I placed eucalyptus greenery and some flowers to tie it all together. TO hide the ugly umbrella pole, it was wrapped in burlap then greenery flowing around for another textural element.


Special Touches
There were a few items we created for special custom touches that just added to the fun of the evening.
The first was a S’more table. We placed it near our beautiful fire pit and used more wood stumps to create various heights on the table. I used little wood berry baskets to place the candy in and chalkboard labels for the candy names. Adding various types of chocolate was a huge hit and they were enjoyed by all! the table had candles and a lantern to add to the rustic decor effect.


Another item that was fun (and necessary!) was a Bug Spray table. But have you seen how ugly those cans are? Not ideal for wedding decor. So they were wrapped with marble contact paper, and a piece of jute tied around them. We added a fun little sign, placed them in a basket and voila, fancy bug spray station…and may I say it was very much appreciated by our guests!

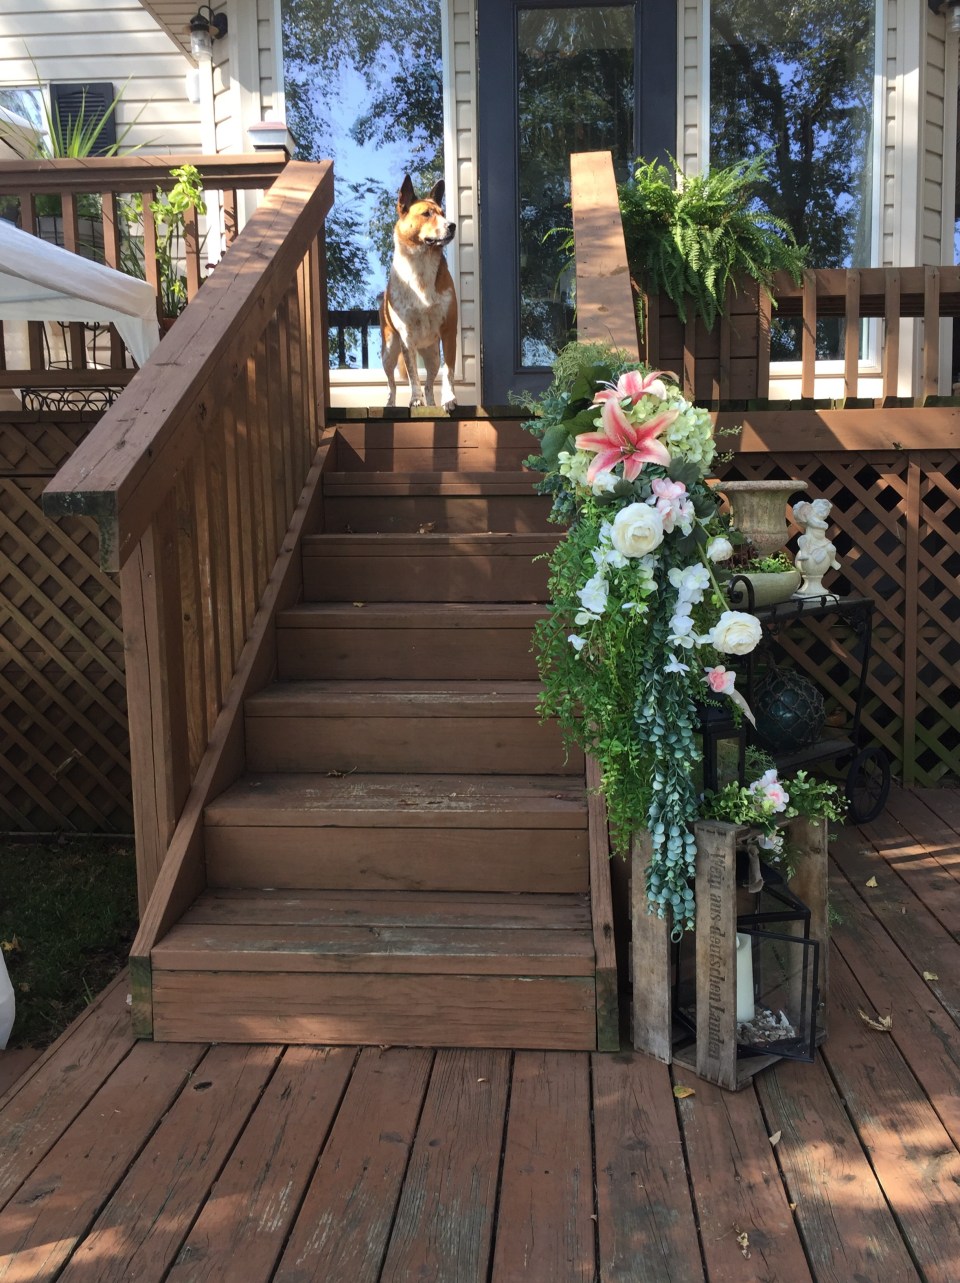
I also added several more floral accents around. Swags flanked the gate posts, and were hung from the deck banister railings. The center railing where the bride walked down had a mix of several types and lengths of greenery cascading down in layers where a few floral accents were added. Then to finish off the look, I add an old crate, and some pretty lanterns. ( The fur baby shown in photo was the flower girl with her own floral collar)
We also hung decorated lanterns from trees, wrapped the base of the trees with tiny twinkle lights. I hid a few unsightly yard items like a water spiket and hose with an old pallet and ladder decorated with greenery.
A chalk board easel was used for the menu and a mini floral swag added a little prettiness to it.
One final detail was the sparkler send off. We had huge sparklers and displayed them in a large urn with a fun chalkboard sign with instructions

It was a very beautiful and memorable evening, as it should be. To avoid stress there are a few things I would highly recommend (did I mention we planned and executed this whole thing with less than 3 months to plan? )
- Using permanent flowers is economical if you are planning and making arrangements yourself. You can make them way ahead of time and having extra left over allows you to add small pieces and leftovers to areas needing extra love.
- Flowers and cakes can be ordered ahead of time from places like Sam’s & Costco for a great price. Then you can add your own special touches and customize from there.
- The brides bouquet were flowers from Costco and I arranged it how we wanted, then wrapped with simple burlap and used grandmothers hanky to tie it all together, for “something old”.
- The cake was also purchased from Costco. Then it was unfrosted for a more rustic, naked cake effect look. You can then add your own flowers and topper.
- Buying just once type of flower in bulk that is real and adding it in places throughout your venue will tie all the decor together and make it less busy. The baby’s breath added that for us, and the fragrance was wonderful.
- Draw out or map your venue setup then divided it into zones. That way you can then write out your decor ideas, needs and thoughts in sections and take it one at a time. This keeps all your ideas organized and not scattered all over the place. On set up day, you can then assign different people a section and have the decor ready for the designated zone.
- Welcome area
- Wedding area
- Reception/food area
- Cake area
- Dance floor or entertainment area
Weddings are truly a magical time. It’s such a bittersweet time, you are thrilled for your child and their future, yet it’s hard to believe your baby is really old enough and where did the time go? The best advice I have is to communicate constantly, listen to the wants of the bride and groom, reasearch your options and resources and most of all, search Pinterest and blogs like this for ideas that others may have!


I hope this post and the photos have been helpful and inspiring for your next event. If you have any questions or would like help with ideas for your own event, please contact me, I would love to help you!
Happy entertaining!


")


Beautiful!! What is the covering on the cake table? I didn’t know if it was a linen table cloth or what? You did a fantastic job!
Hi there, and thank you! It is actually a bleached or white burlap. I wanted something to add to the rustic theme we had going…and I didn’t want one of my nice linen cloths getting damaged by the wood slices.
Thanks for stopping by, I appreciate your comments friend. xoxo
~Deborah
Where did you get your tablecloth that you have for your desert table? Your wedding look so gorgeous!!! Congratulations and wishing you all the best!
Hi Caroline,
Its just a yardage of burlap that I purchased at a fabric store.
Thanks
Hi Caroline,
Its juste burlap fabric I purchased at the fabric store.
Thanks
Deborah